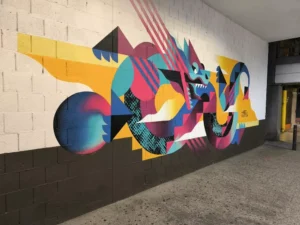
When you see a razor-sharp mural printed by a modern wall printer (also called a wall printing machine, vertical wall printer, UV wall printer, wall mural printer, or direct-to-wall printer / DTW printer), you’re not just seeing “ink on a wall.”
You’re seeing three technologies working as one system:
Vertical robotic inkjet wall printing (scale + accuracy)
3D / 2.5D textured printing (premium effects + higher margins)
UV LED curing (instant dry + multi-surface durability)
If you want to buy a wall printing machine (or you want to build a wall printing business), understanding these technologies—not marketing buzzwords—is how you avoid expensive mistakes and choose the right configuration.
1 Technology 1: What is vertical wall printing?
Core concept
Vertical wall printing is a robotic, non-contact inkjet process that prints digital images directly onto almost any vertical surface—at almost any size.
In a desktop printer, paper moves inside the machine. In a vertical wall printing machine, the machine moves along the wall:
The system runs along a temporary rail/track parallel to the wall
A motorized carriage moves the printhead up and down on a vertical mast
Together, the machine scans the image line-by-line across the wall
Why vertical printing matters
1) Non-contact printing on rough surfaces
The printhead stays a few millimeters away from the wall using sensors (commonly ultrasonic or laser). Because it does not physically touch the surface, you can print on:
brick wall printing (brick, stone)
concrete wall printing (raw or sealed)
plaster and textured paint
rough wood and uneven finishes
This protects the printhead and helps maintain consistent output.
2) “Infinite width” murals
Desktop printers are limited by paper width. With wall printing, the “media” is your wall.
With enough track space, you can:
move segment by segment
print multiple tiles
stitch them into one large mural (seamless in appearance when aligned correctly)
That’s how you print full-wall illustrations, feature walls, and multi-meter commercial graphics.
3) True on-site production (direct-to-wall)
Everything happens at the client location:
no printing vinyl rolls first
no transporting huge panels
less risk of bubbles, wrinkles, or misaligned stickers
To customers, it feels like ordering a custom mural—not “a big sticker.” For you, it’s a higher perceived-value service.

2 Technology 2: How does 3D wall printing work?
Core concept
In wall printers, “3D” usually means 2.5D texture: the printer builds ink in layers to create a tactile relief you can feel.
Modern machines often support two “3D” modes:
Mode A: Visual 3D (optical depth on a flat wall)
This is not physical thickness. It’s optical realism created by:
high resolution
precise droplet placement
controlled dot density and gradients
It makes:
bricks look “grab-able”
windows feel like they open into a scene
objects “pop” visually off the wall
Best uses: trompe-l’œil murals, themed interiors, creative advertising walls.
Mode B: Tactile 3D (embossed / raised texture you can feel)
This is physical texture.
With specialized RIP control, the printer:
sprays multiple layers of white ink in selected areas to build height
prints the full-color artwork on top of the raised base
Common applications
raised logos that feel premium
faux oil paintings with “brushstroke texture”
tactile elements in public spaces (where appropriate)
Business value: textured prints are premium upsells. They justify higher pricing because clients can see and feel the difference.
- Internal link idea: a dedicated “3D / Embossed Wall Printing” page can rank for:
3D wall printer, 3D wall printing, embossed wall printing, 2.5D wall printing, tactile wall graphics.
3 Technology 3: Why UV LED curing is essential for wall printers
3.1 Core concept
UV curing uses high-intensity UV LED light to instantly turn liquid UV ink into a hard, durable polymer film the moment it hits the wall. Without UV curing, wall printing would be limited to absorbent indoor surfaces. UV curing is what turns wall printers into multi-surface, indoor–outdoor-capable tools (when conditions allow).
3.2 UV curing step-by-step (what’s actually happening)
Professional systems typically mount UV LED lamps near the printhead:
Jetting – The printhead ejects UV-curable ink onto the wall
Exposure – UV LEDs illuminate the wet ink within milliseconds
Polymerization – Photo-initiators react and harden the ink into a solid film
Result: instant-dry output that’s tough and stable.
3.3 3 commercial advantages of UV technology
Advantage 1: Prints on many materials (absorbent and non-absorbent)
Because UV ink hardens on the surface (not by soaking in), you can print on:
non-absorbent: glass, ceramic tile, stainless steel, acrylic
porous: raw wood, brick, concrete
This is why wall printers can move between apartments, offices, restaurants, schools, factories—and some outdoor projects.
Advantage 2: Instant turnaround with minimal disruption
UV-cured prints are:
fully dry
smudge-free
ready for use immediately
No long dry time like paint, and typically less downtime for the client space.
Advantage 3: Durability that commercial clients pay for
UV-cured output behaves like a thin protective film:
water-resistant
scratch/abrasion resistant
formulated to resist sunlight fading for years (environment dependent)
That’s valuable for:
high-traffic corridors and lobbies
kids’ areas and schools
signage and OOH-style graphics (where conditions allow)
Putting it together: why the “system” matters more than one feature
A professional wall printer is not one technology. It’s the synergy:
vertical robotics give you scale and on-site production
UV curing gives you material range + durability
3D/embossed modes give you premium upsells
That’s why higher-end models are positioned as “systems,” not just hardware.

What to check before you buy a wall printing machine
This is the practical “buyer filter” that prevents wrong purchases.
1) Your wall surfaces (this decides your real output)
Ask yourself what you print most:
smooth painted drywall (best for photos + small text)
brick / concrete (best for bold graphics)
tile / glass / metal (needs surface prep + adhesion testing)
2) Your core workflow (speed vs premium)
Do you sell fast standard murals?
Or do you sell premium projects with strict QC?
Do you need 3D / embossed upsells?
3) White ink workflow (especially on dark walls)
If you print on dark paint or want bright branding, white ink matters—especially for 3D tactile effects (raised white base).
4) What “automatic” really means
Many buyers search “automatic wall printing machine.” In practice, automation usually means:
easier alignment support
safer distance control
fewer operator errors
It does not mean “zero setup” or “no wall prep.”
Wall Printer Quote Checklist (Send These 7 Items)
To get an accurate wall printer quote fast, you can send:
Country + city (for shipping estimate)
Typical wall height range (e.g., 2.5m / 3m)
Typical job size (sqm per job + jobs per month)
Main wall surfaces (drywall / brick / concrete / tile / wood / glass)
Indoor only or indoor + outdoor
Dark walls needed? (white ink workflow: yes/no)
Power standard (voltage + plug type)
CTA: Send these 7 items and you’ll get a recommended configuration + a clear quote.
FAQs:
What is a wall printer?
A wall printer (wall printing machine) is a vertical UV inkjet system that prints murals directly onto walls on-site.
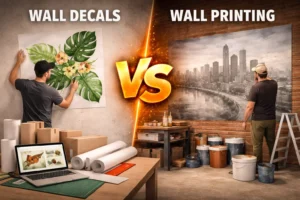
What is a direct-to-wall printer (DTW printer)?
A DTW wall printer prints directly onto the wall surface instead of printing on vinyl/wallpaper and installing it later.
Can a wall printing machine print on brick or concrete?
Yes. Brick and concrete can be printed, but texture reduces fine detail. Bold graphics and high contrast designs work best.
What is 3D wall printing?
In wall printing, “3D” often means either visual depth (optical 3D) or 2.5D tactile texture where ink layers build a raised relief you can feel.
Why do wall printers use UV LED curing?
UV LED curing hardens ink instantly into a durable film, enabling faster turnaround and printing on more materials like tile, glass, brick, and concrete.