If you want fewer reprints, fewer “mystery defects,” and faster on-site delivery, you need one thing more than any feature: a wall printing workflow that your team follows the same way every time. This page is the SOP center—a single hub you can bookmark and use to train operators, standardize quoting, and connect every “how-to” article into one consistent process.
1) Wall printing workflow: why you need a standard SOP
A wall printer can produce great output and still fail commercially if results are inconsistent.
Inconsistency across different walls, paint conditions, operators, and time windows.
A standard SOP reduces decision chaos and makes setup predictable.
Fewer defects, faster delivery, and more accurate quoting—so your operation can scale.
A standard SOP solves three problems
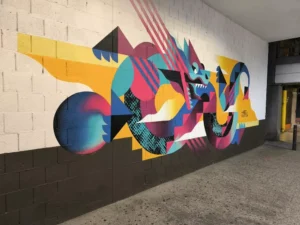
- Quality control: fewer visible defects (banding, edge wobble, seams).
- Speed: faster setup and fewer on-site “what now?” decisions.
- Quote accuracy: fewer surprise costs because inputs are standardized.
2) Intake & site survey SOP (quote-ready checklist)
Most job failures are predictable before you arrive. Intake collects the minimum inputs that prevent surprises.
2.1 Quote-ready intake checklist (copy/paste)
Collect these before confirming schedule:
Location (Country, City)
Wall size (W × H) + straight-on photos
Surface type (smooth paint / textured / brick / tile / wood / glass)
Indoor only or indoor + outdoor
Dark wall needed? (white ink workflow yes/no)
Access constraints (stairs, elevator, narrow corridors, furniture)
Work-hour restrictions (night work, weekends, noise limits)
Timeline (deadline date + allowed work window)
File status (ready file / needs design help)If you’re quoting fast: request a clear quote
2.2 On-site site survey (10-minute walk-through)
- Confirm wall measurements (don’t trust memory)
- Check obstructions and edges (outlets, trims, doors)
- Check floor flatness (leveling matters)
- Check lighting/reflections (gloss surfaces reveal defects)
- Confirm ventilation and safety zone
3) File prep SOP (avoid scale/edge issues)
File mistakes are a top cause of rework because they only show up after printing starts.
3.1 File prep checklist (before you leave the office)
- Confirm final wall size (W × H) and set the design to exact scale
- Ensure adequate resolution (avoid pixelation)
- Keep safe margins away from trims and corners
- Convert/outline fonts if needed
- Export in your standard format and keep a “final locked” version
- Prepare a small test patch section inside the design (gradient + thin lines)
3.2 Version control rule
Name files with:
Example:
CafeLogoWall_2026-02-09_3.2x2.4m_v3_FINAL
This prevents printing the wrong version under pressure.
4) Surface prep SOP (the #1 quality driver)
A perfect machine cannot fix a dusty, chalky, or unstable wall surface.
4.1 Surface prep checklist (standard)
- Remove dust and loose debris
- Wipe oils/grease if needed (kitchens/gyms)
- Check for peeling paint or moisture problems
- For porous/rough walls: plan a sealing step if required
- Create a clear protected work zone (floor/furniture cover)
4.2 Texture reality (set expectations)
- Thin lines may soften
- Edges may look less sharp
- Gradients can appear less smooth
5) Setup SOP (transport → leveling → safe zone)
Consistency is built here. A stable setup reduces alignment issues and visible defects.
5.1 Setup checklist (on arrival)
- Define the safe working zone (tape boundary if needed)
- Protect floors and nearby furniture
- Position the machine with enough clearance for movement
- Confirm power access and cable safety
- Level the machine (do not skip)
5.2 “One operator” vs “two operator” rule
If your equipment and site constraints require two people safely, plan it. Rushing setup causes more rework than it saves.
6) Calibration & nozzle check SOP (repeatability)
Calibration is what makes output repeatable across days and sites.
6.1 Daily pre-print checks (before any client wall)
- Basic inspection (loose parts, cables, visible contamination)
- Nozzle check
- Alignment check (quick validation pattern)
- Confirm ink workflow for the day’s surfaces (especially dark walls)
7) Test patch SOP (adhesion + color + texture)
A test patch is your insurance policy. It prevents “looks fine until it fails” problems.
7.1 What a test patch must include
- a gradient strip (reveals banding)
- thin lines (reveals drift)
- small text (reveals edge quality)
- a dark patch (if you print dark walls/white ink workflow)
7.2 Test patch pass/fail rules
- Adhesion feels stable after a brief dry period
- Gradients are smooth enough for client standard
- Thin lines do not wobble noticeably
- Color under real lighting matches expectation
- Surface is dusty/chalky and ink doesn’t bond
- Texture causes unacceptable detail loss
- Banding is obvious
- Seams risk is high due to setup instability
8) Printing SOP (execution + monitoring)
Professional results come from monitoring and discipline, not speed.
8.1 Start-of-print checklist
- Confirm the correct file version
- Confirm the correct wall size reference
- Confirm start point and alignment
- Confirm client timeline and noise expectations
8.2 During print monitoring
- Banding or density changes
- Edge wobble on text/lines
- Surface anomalies (bubbles, chips, glossy patches)
- Environmental interruptions (people entering zone)
9) Pause/resume & continuity SOP (seams prevention)
Many “bad installs” come from visible seams after pauses.
9.1 When you should pause
- Immediate defect appears (banding, missing lines)
- Surface obstruction discovered (hidden crack, loose paint)
- Safety interruption (client movement in the zone)
9.2 Resume checklist
- Verify alignment reference
- Re-check seam area in close-up
- Resume with controlled speed and monitor seam segment first
9.3 Continuity rules (simple)
If a seam is visible from normal viewing distance, it’s a delivery risk. Document the seam area and decide whether to rework immediately or adjust design placement.
10) Finish & client handoff SOP (QC + care instructions)
This is where you lock in trust, reviews, and referrals.
10.1 Final QC checklist (walk the wall)
- Wide photo for context
- Close-ups of edges, text, gradients
- Check corners and near trims/outlets
- Confirm color under real lighting
10.2 Client care instructions (keep it simple)
- When it can be touched/cleaned
- Recommended cleaning method (water-only first)
- What to avoid (abrasive scrubbing, harsh chemicals)
- What to do if wall surface starts to fail (peeling paint is a wall issue)
11) Post-job cleanup & daily maintenance SOP
Maintenance is not optional—it protects consistency and reduces downtime.
11.1 Post-job cleanup checklist
- Clean the work area
- Pack equipment carefully
- Remove dust contamination sources
- Store consumables correctly
- Log issues observed during the job
11.2 Daily maintenance (end-of-day routine)
- Nozzle check and basic care routine
- Inspect for ink buildup or contamination
- Confirm next job’s surfaces and plan any special prep
12) Troubleshooting SOP (fast diagnosis by symptom)
When something goes wrong, diagnosis speed matters more than guessing.
12.1 Symptom → likely cause → first action
13) SOP library: internal links to all operation guides
Keep these links near the bottom so readers can jump to the right deep-dive guide.
- /where-to-buy-a-wall-printer/ — channel comparison + traps
- /wall-printer-for-sale/ — transactional packages + quote inclusions
- /Contact-us/ — quote intake checklist and fast configuration
- /portable-wall-printer/ — mobile setup SOP + transport checklist
- /automatic-wall-printing-machine/ — what “automatic” really means + demo proof
- /vertical-wall-printer/ — height/stability comparison checklist
- /wall-printer-reviews/ — demo + sample + support evaluation framework
- /print-on-wood-panels/ — prep, sealing, adhesion tests (wood)
- /print-on-brick-walls/ — texture strategy + prep
- /print-on-tile-and-glass/ — adhesion and cleaning expectations
- /wall-printer-maintenance/ — daily/weekly care checklist
- /wall-printer-troubleshooting/ — defect diagnosis library
- /support/ — response time expectations + spare parts plan
14) Practical note: where Printava fits (low-hype, workflow-first)
Operations succeed when configuration matches real job conditions + teams follow the same SOP.
A smooth operation isn’t only about the machine—it’s about whether the configuration matches your real job profile (typical wall height, surfaces, dark-wall needs, and how often you print on-site) and whether your team has a clear SOP to follow. Printava’s approach is usually to align configuration with those practical constraints and support the operator with setup guidance, maintenance SOP, and a starter spare-parts plan. For service teams, that tends to reduce rework and make delivery more predictable without relying on “perfect conditions.”
CTA
Use the intake checklist and send your wall height range, surfaces, and city to get a clear quote.